Tuesday, March 17, 2009

How to Remove vista booting options in xp

0 comments


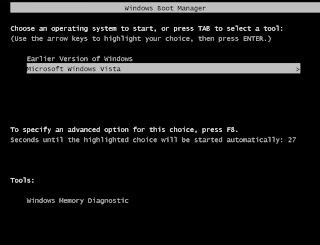
Many of the people are facing the dual boot problems in XP even though they formatted the installed OS partition (Vista) .If u also facing same problem then follow the instructions given below to delete the extra boot option in booting.

Procedure:

Method: 1

1.Boot in to Windows XP

2.Put Vista dvd in to DVD-Rom

3.Then Go to Start->Run

4.Their type

X:\boot\bootsect.exe /nt52 All /force


Note:
Where " X " is DVD-Rom Drive letter


Method 2:


1.Boot your pc using Windows XP SP2 cd

2.Run the Recovery console .

3.When console is loaded type " fixboot " and Press Enter

4.Type " fixmbr " and Press Enter

5. Reboot your Pc and see the Result. That's it .....


Sunday, March 15, 2009

Airtel Free GPRS-Internet

5 comments
Hi guys i got this information from an forum that i want to share it to you . After searching lot of
forums i found this in a pdf document.

Lets go to the procedure ,

Requirements::

1. Mobile with Gprs enabled
2. Data Cable or bluetooth
3. Airtel Sim (Prepaid) with "airtel live" activated
4. PC with Java or Jre must be installed.

Softwares U need:

1. Http Interceptor (download)(Serial_Key)
2. Your-freedom (download)


Sites u need to be Registered:


1. Your-freedom (Register) and Activate the account by email sent by them.


Procedure:
:

1.If you are using the Nokia mobile its Very simple see the below screen shots other wise u need to search for the Access point or APN to edit and type airtelfun.com in APN(accesss point) while connecting to the airtel through dial up or packet data connection.

Follow the screen shots for nokia mobile users.


Step 1:


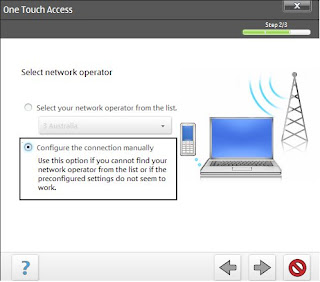
Click on settings on the Pc suite and u will get two options to choose.Their select manually and move to next.

Step 2:
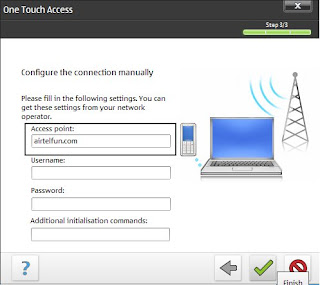


Their u need to edit the Access point to " airtelfun.com " and click finish.

Step 3:
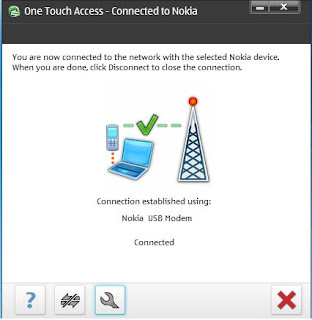


Finally u will be connected to Airtel live at 460.8 kbps (or) 115 kbps.


From here u need software which is downloaded and installed in PC.

Follow the instructions with screen shots carefully.

Step 4: Install and Run the " Http Interceptor " software and follow the screen shots closely which is to be
edited.
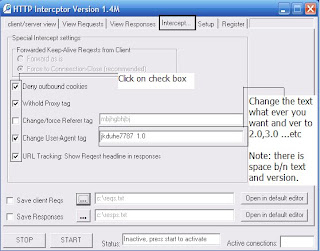


In the above screen shot Check the options and make changes to User-Agent tag under interceptor tab if u want ,other wise use asusual which is shown above .


Step 5:
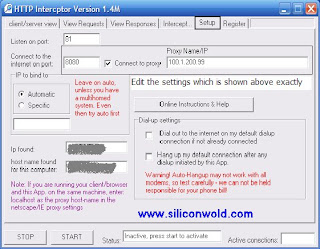


Edit the proxy and port address under Setup tab as shown above

Step 6:
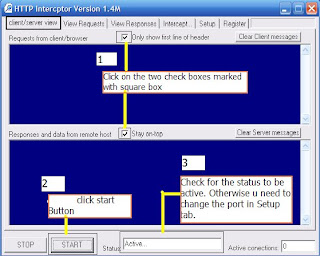


Click Start button after checking the check boxes as shown above and check for the status to be active after clicking on start button. After finishing the above steps carefully dont' close the application.

NOTE:

1.Don't Close the application after Click on start button and minimize to Task bar.


2.First Run the Http Interceptor After Establishing connection to Airtel Live for every time you want to connect to internet.


From here u need another software to connect to the internet through Airtel .

Follow the instructions with screen shots carefully.

Step 7:


Open the the software Your-freedom client which is downloaded and installed in PC.
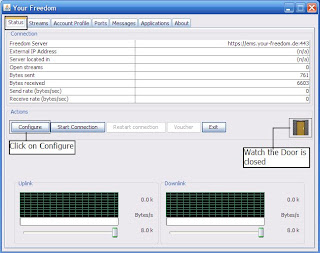


Click on configure to configure the server settings under status tab in your-freedom client software.

Step 8:
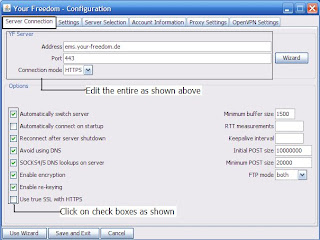


Fill all the fields and mark the check boxes which is shown above (i.e) address,port etc under the server connection tab.

Step 9:
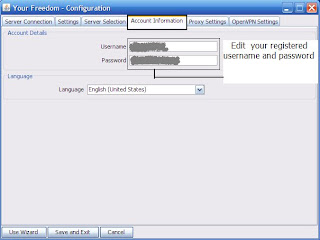


Enter the Registered Username and Password in the Account information tab and select the language u want .

Step 10:
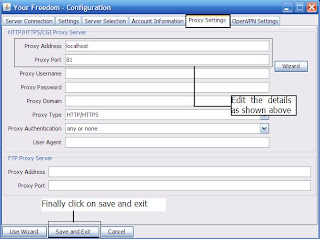


Fill the proxy address and proxy port which is shown in screen shot and follow exactly.Finally click save and exit button under Proxy Settings tab.

Step 11:
After the completion of configure settings window go to Ports tab in you-freedom client
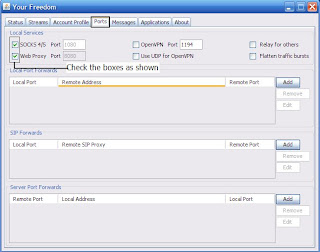


Their Click on both the check boxes (i.e) Sock port and web proxy port under Ports tab as shown above.
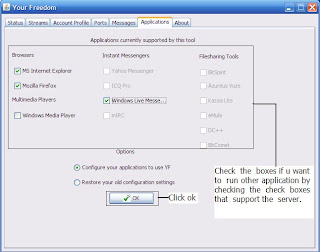

Step 12:


Here click on the check boxes that are going to be used (i.e) If u want to use Mozilla Firefox to browse internet mark on firefox otherwise u want to use IE (Internet Explorer) mark on IE.Then Click on ok button to apply settings.

Step 13:
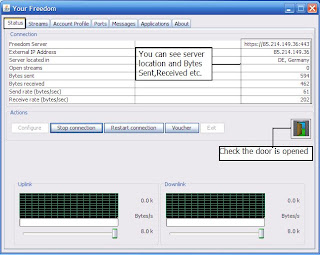


After completion of all the above Steps successfully as shown , go to Status tab and click on Start connection button . In a few seconds u will be connected to internet and u will have server location,bytes sent,receiced information. Finally be sure to check the Door icon is open or not.This shows whether u are fully connected to internet or not .Thats the settings from your-freedom client .

Note: Be sure that the Htpp Interceptor is running and its status is active before Click on start connection button in Your-freedom
Saturday, March 14, 2009

Image in folder background

0 comments
Image in folder background


This trick will help u in setting a pic in your folder background .

1.Go to Control panel -> Folder options -> view tab -> show hidden files

2.Uncheck the 2 boxes below it

3.Open a folder, search for a file desktop.ini


There u will have somecode like this or a bit different

[.ShellClassInfo] IconFile=%SystemRoot%\system32\SHELL32.dll IconIndex=3


4.Now add the lines below :

[ExtShellFolderViews] {BE098140-A513-11D0-A3A4-00C04FD706EC}={BE098140-A513-11D0-A3A4-00C04FD706EC} [{BE098140-A513-11D0-A3A4-00C04FD706EC}] IconArea_Image=


5.Now copy the path location of the Picture or Wallpaper that u want to use and Paste it at the end of the line "image=" and paste the address path.

Example::


[ExtShellFolderViews] {BE098140-A513-11D0-A3A4-00C04FD706EC}={BE098140-A513-11D0-A3A4-00C04FD706EC} [{BE098140-A513-11D0-A3A4-00C04FD706EC}] IconArea_Image=C:\Documents and Settings\win xp\My Documents\My Pictures\kihlo32qwe.jpg


6.Finally Refresh and Close the folder and check again


That's it Enjoy !!!!!!!!!

Saturday, March 7, 2009

Turning off the Help on Min, Max, Close Icons

0 comments
When the mouse goes over the minimize, maximize and close icons on the upper right hand side of a window, you normally get a display telling you want those are for.

Procedure

To Disable that display:

1. Click Start->run->type regedit and Hit Enter

2. Go to HKEY_CURRENT_USER \ Control Panel \ Desktop

3. Create a String Value called MinMaxClose

4. Give it a value of 1

5. Reboot

Disabling the click on My Computer

0 comments
You can restrict any user to access your system drives if you disable the click feature on My Computer. User will get no any changes when he will try to open My Computer.By editing the windows registry keys, you can Disable the click feature on My Computer.

Follow the given steps to Disable My Computer setting.

1.Click Start->run->type regedit and hit Enter

2.In Registry editor Click Edit in the menu bar and Select Find (or) Simply Press Ctrl+F and
Copy and Paste the below key exactly which is given below.

20D04FE0-3AEA-1069-A2D8-08002B30309D


3.May be you will find this value on path HKey_Classes_Root \CLSID section

4.Here Delete the entire section of this value.

5.Now close the registry editor and restart your computer after any changes to go into effect.

Turn-ON Your PC in 10 seconds

0 comments
Many of the people are facing the problem that to turn on their PC takes lots of time. It may take atleast 2-3 minutes. Let's see the tip guide u to reduce the ON time (i.e) Start up time to atleast some extent.

Here We Go,

Procedure


1.Click Start->Run->type Regedit and hit Enter

2.This will open Registry Editor.

Go to HKEY_LOCAL_MACHINE\SYSTEM\CurrentControlSet\Control\ContentIndex

3.Now there find the Key Called "Startup Delay"

4.Double Click On It and now where its Base,Click Decimal

5.Now its Default Value Is 4800000 (75300:hexadecimal)

6.Change The Value To "40000"

7.Here you go you have done it

8.Now close the Registry Editor and Restart Your Computer

Tuesday, March 3, 2009

XP Run Commands

0 comments

Here is a list of commands you can execute from the Run command prompt in XP

Click Start->select run->type the below shown

Ex:-type in Run dialog box access.cpl


Accessibility Controls
access.cpl
Add Hardware Wizard
hdwwiz.cpl
Add/Remove Programs
appwiz.cpl
Administrative Tools
certmgr.msc
Character Map
charmap
Check Disk Utility
chkdsk
Clipboard Viewer
clipbrd
Command Prompt
cmd
Component Services
dcomcnfg
Computer Management
compmgmt.msc
Date and Time Properties
timedate.cpl
DDE Shares
ddeshare
Device Manager
devmgmt.msc
Direct X Control Panel (If Installed)
directx.cpl
Direct X Troubleshooter
dxdiag
Disk Cleanup Utility
cleanmgr
Disk Defragment
dfrg.msc
Disk Management
diskmgmt.msc
Disk Partition Manager
diskpart
Display Properties
control desktop
Display Properties
desk.cpl
Display Properties (w/Appearance Tab Preselected)
control color
Dr. Watson System Troubleshooting Utility
drwtsn32
Driver Verifier Utility
verifier
Event Viewer
eventvwr.msc
File Signature Verification Tool
sigverif
Findfast
findfast.cpl
Folders Properties
control folders
Fonts
control fonts
Fonts Folder
fonts
Free Cell Card Game
freecell
Game Controllers
joy.cpl
Group Policy Editor (XP Prof)
gpedit.msc
Hearts Card Game
mshearts
Iexpress Wizard
iexpress
Indexing Service
ciadv.msc
Internet Properties
inetcpl.cpl
IP Configuration (Display Connection Configuration)
ipconfig /all
IP Configuration (Display DNS Cache Contents)
ipconfig /displaydns
IP Configuration (Delete DNS Cache Contents)
ipconfig /flushdns
IP Configuration (Release All Connections)
ipconfig /release
IP Configuration (Renew All Connections)
ipconfig /renew
IP Configuration (Refreshes DHCP & Re-Registers DNS)
ipconfig /registerdns
IP Configuration (Display DHCP Class ID)
ipconfig /showclassid
IP Configuration (Modifies DHCP Class ID)
ipconfig /setclassid
Java Control Panel (If Installed)
javaws
Keyboard Properties
control keyboard
Local Security Settings
secpol.msc
Local Users and Groups
lusrmgr.msc
Logs You Out Of Windows
logoff
Microsoft Chat
winchat
Minesweeper Game
winmine
Mouse Properties
control mouse
Mouse Properties
main.cpl
Netstat
netstat
Network Connections
control netconnections
Network Connections
ncpa.cpl
Network Setup Wizard
netsetup.cpl
Notepad
notepad
Nview Desktop Manager (If Installed)
nvtuicpl.cpl
Object Packager
packager
ODBC Data Source Administrator
odbccp32.cpl
On Screen Keyboard
osk
Opens AC3 Filter (If Installed)
ac3filter.cpl
Password Properties
password.cpl
Performance Monitor
perfmon.msc
Performance Monitor
perfmon
Phone and Modem Options
telephon.cpl
Power Configuration
powercfg.cpl
Printers and Faxes
control printers
Printers Folder
printers
Private Character Editor
eudcedit
Quicktime (If Installed)
QuickTime.cpl
Regional Settings
intl.cpl
Registry Editor
regedit
Remote Desktop
mstsc
Removable Storage
ntmsmgr.msc
Removable Storage Operator Requests
ntmsoprq.msc
Resultant Set of Policy (XP Prof)
rsop.msc
Scanners and Cameras
sticpl.cpl
Scheduled Tasks
control schedtasks
Security Center
wscui.cpl
Services
services.msc
Shared Folders
fsmgmt.msc
Shuts Down Windows
shutdown
Sounds and Audio
mmsys.cpl
Spider Solitare Card Game
spider
SQL Client Configuration
cliconfg
System Configuration Editor
sysedit
System Configuration Utility
msconfig
System File Checker Utility (Scan Immediately)
sfc /scannow
System File Checker Utility (Scan Once At Next Boot)
sfc /scanonce
System File Checker Utility (Scan On Every Boot)
sfc /scanboot
System File Checker Utility (Return to Default Setting)
sfc /revert
System File Checker Utility (Purge File Cache)
sfc /purgecache
System File Checker Utility (Set Cache Size to size x)
sfc /cachesize=x
System Properties
sysdm.cpl
Task Manager
taskmgr
Telnet Client
telnet
Traceroute
tracert 
User Account Management
nusrmgr.cpl
Utility Manager
utilman
Windows Firewall
firewall.cpl
Windows Magnifier
magnify
Windows Management Infrastructure
wmimgmt.msc
Windows System Security Tool
syskey
Windows Update Launches
wupdmgr
Windows XP Tour Wizard
tourstart
Wordpad
write

Monday, March 2, 2009

Disable IE Error Reporting

0 comments
Manage Internet Explorer Error Reporting
This tweak removes the IE Error Reporting tool from appearing with the option to send browser debugging reports to Microsoft.


1.Click Start->Run->type regedit

2.Go to HKEY_LOCAL_MACHINE\Software\Microsoft\Internet Explorer\Main


Note:
Create both values listed below and set according to the bold type for the tweak to function properly.


3.Modify/Create the Value Name [IEWatsonEnabled] according to the Value Data listed below.

4.Data Type: REG_DWORD [Dword Value] and Value Name: IEWatsonEnabled

5.Value Data: [0 - Disabled / 1 - Enabled]


3.Modify/Create the Value Name [IEWatsonDisabled] according to the Value Data listed below.

4.Data Type: REG_DWORD [Dword Value] and Value Name: IEWatsonDisabled

5.Value Data: [0 - Disabled / 1 - Enabled]

6.Exit Registry and Reboot

Restore Missing CD or DVD Drive

0 comments
Procedure

1.Click Start->Run->type Regedit

2.Go to HKEY_LOCAL_MACHINE\SYSTEM\CurrentControlSet\Control\Class
Key Name: {4D36E965-E325-11CE-BFC1-08002BE10318}

3.Value Data: [Delete All Value Data from UpperFilters and LowerFilters]

4.Exit Registry and Reboot

Note: Do not delete the Key or the Multi-String Values. Delete only the data values.


Reports have filtered in that CD or DVD drives will suddenly cease to exist in XP systems. Most often this has been reported in conjunction with program installations and Windows upgrades, but it has also happened for no apparent reason. This tweak will restore the missing drives after a reboot.

Enable or Disable Recycle bin

0 comments
Procedure

1.click Start->Run->type Regedit

2.Go to HKEY_LOCAL_MACHINE\SOFTWARE\Microsoft\Windows\CurrentVersion\Explorer\BitBucket

3.Modify/Create the Value Data Type(s) and Value Name(s) as detailed below.

4.Data Type: DWORD and Value Name: "NukeOnDelete"

5.Setting for Value Data: [0 = Use Recycle Bin / 1 = Permanently Delete]

6.Exit Registry and Reboot


To avoid the inherent danger of editing the registry, the same results may be obtained by using the procedure detailed below.

1.Right click the Recycle Bin icon on the Desktop and click [Properties]
2.Check the box for [Do Not Move Files to the Recycle Bin]
3.Click [Apply] and [OK]

Enable or Disable Ballon notifications in Taskbar

0 comments
Procedure

1.Click Start-> Run->type Regedit

2.Go to HKEY_CURRENT_USER\Software\Microsoft\Windows\CurrentVersion\Explorer\Advanced

3.Modify/Create the Value Data Type(s) and Value Name(s) as detailed below.

4.Data Type: REG_DWORD [Dword Value] and Value Name: EnableBalloonTips

5.Setting for Value Data: [0 = Balloon Tips Disabled / 1 = Balloon Tips Enabled]

6.Exit Registry and Reboot
 

Tips2All. Copyright 2008 All Rights Reserved Revolution Two Church theme by Brian Gardner Converted into Blogger Template by Bloganol dot com